How to Make a Dried Flower Wreath:
Step-by-Step Tutorial
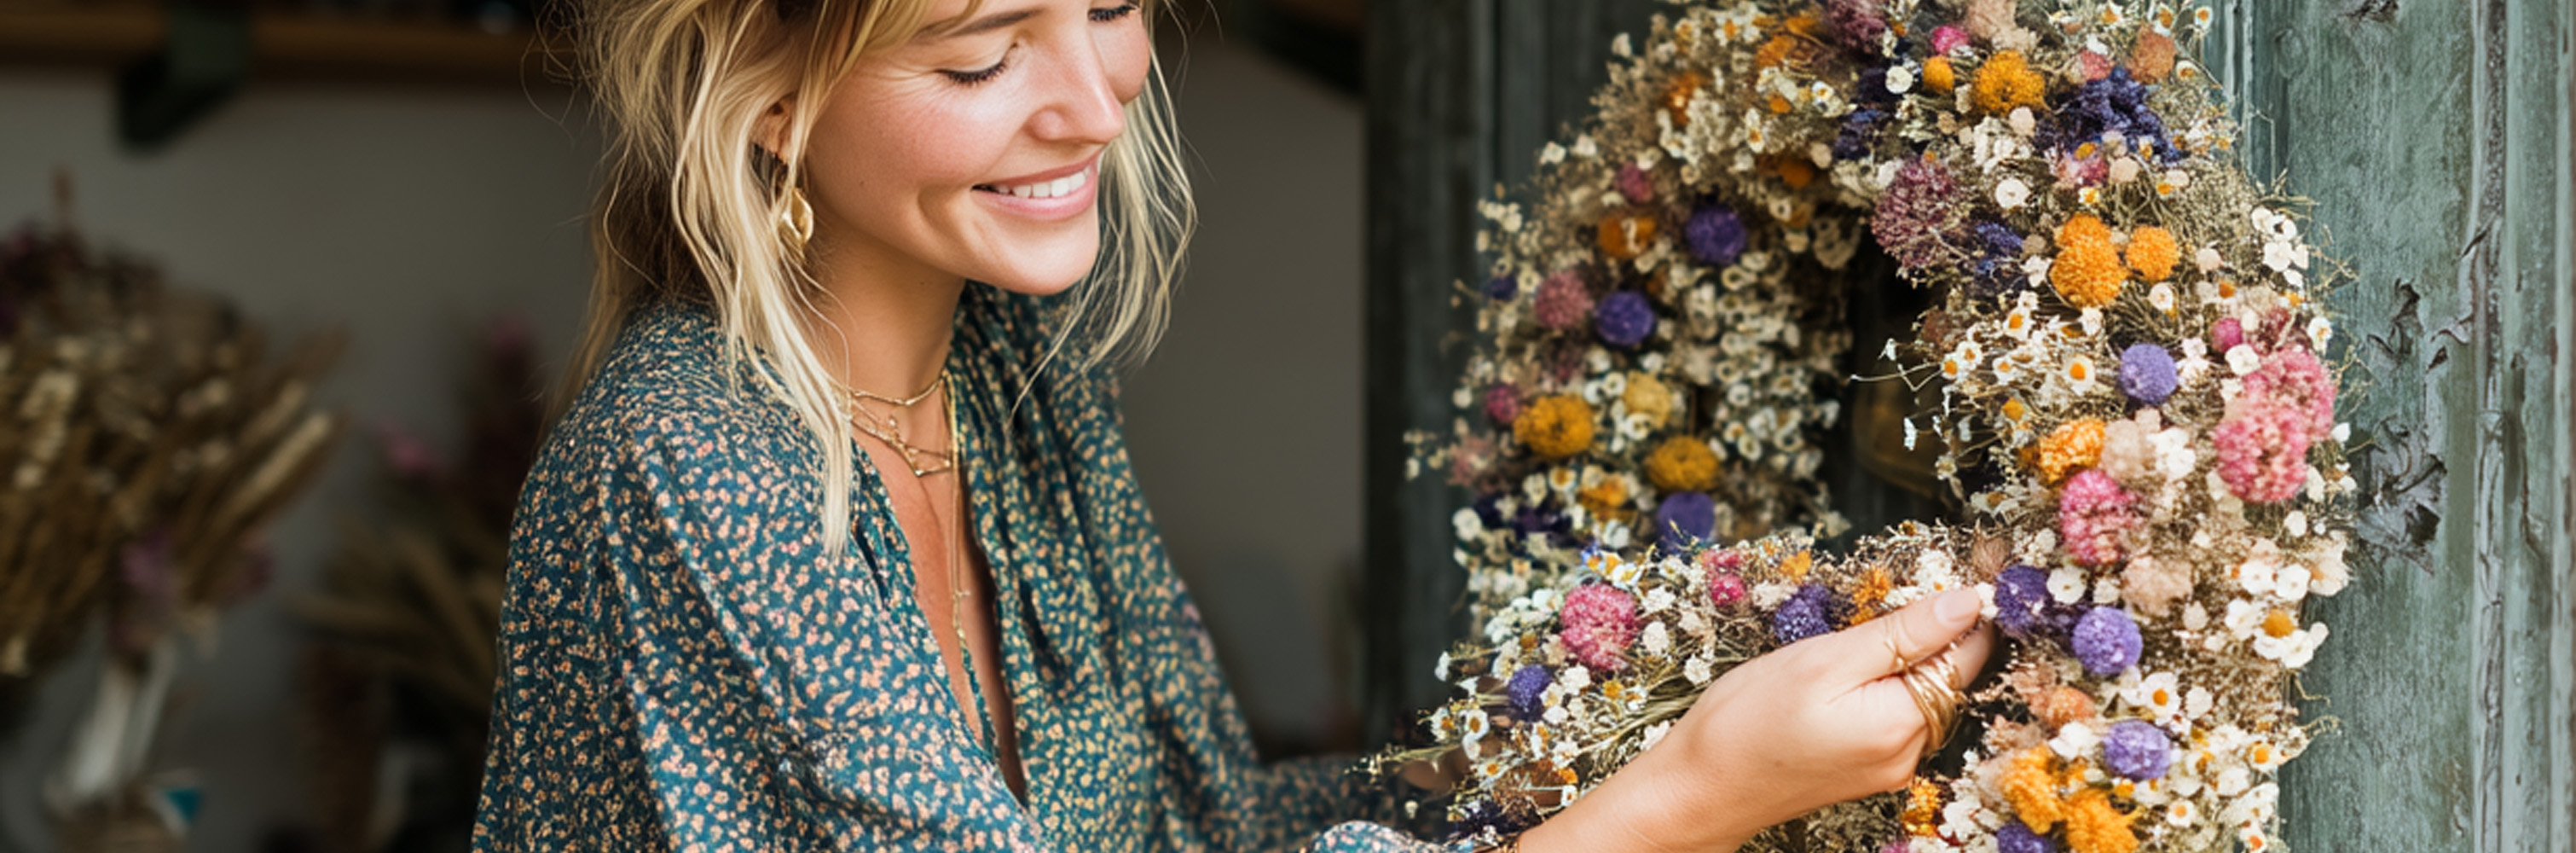
Easy How to Instructions to Make a Beautiful, Natural DIY Wreath at Home
Time needed: around 60 minutes.
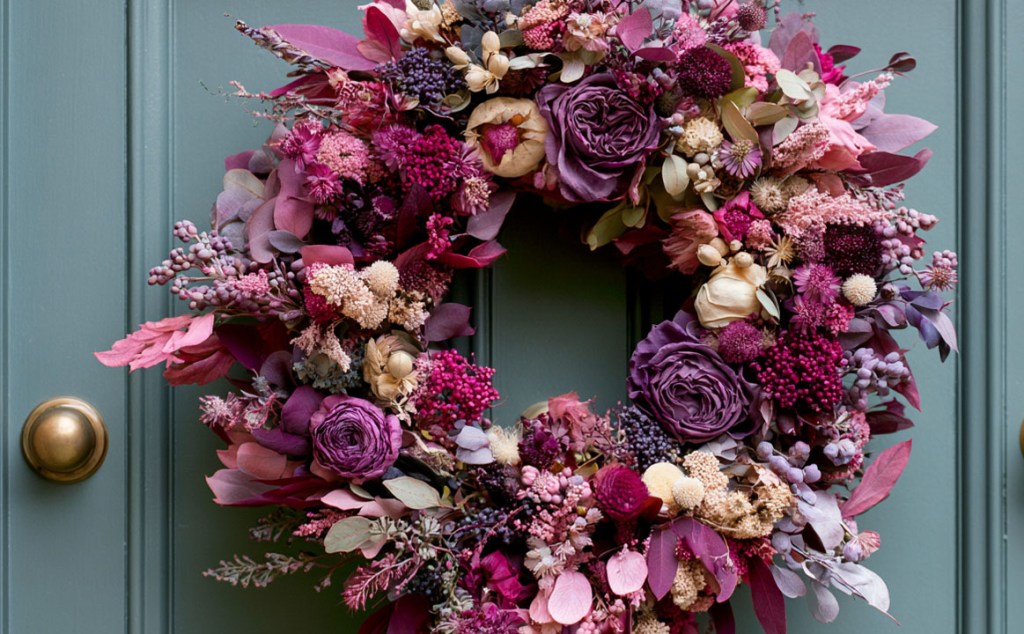
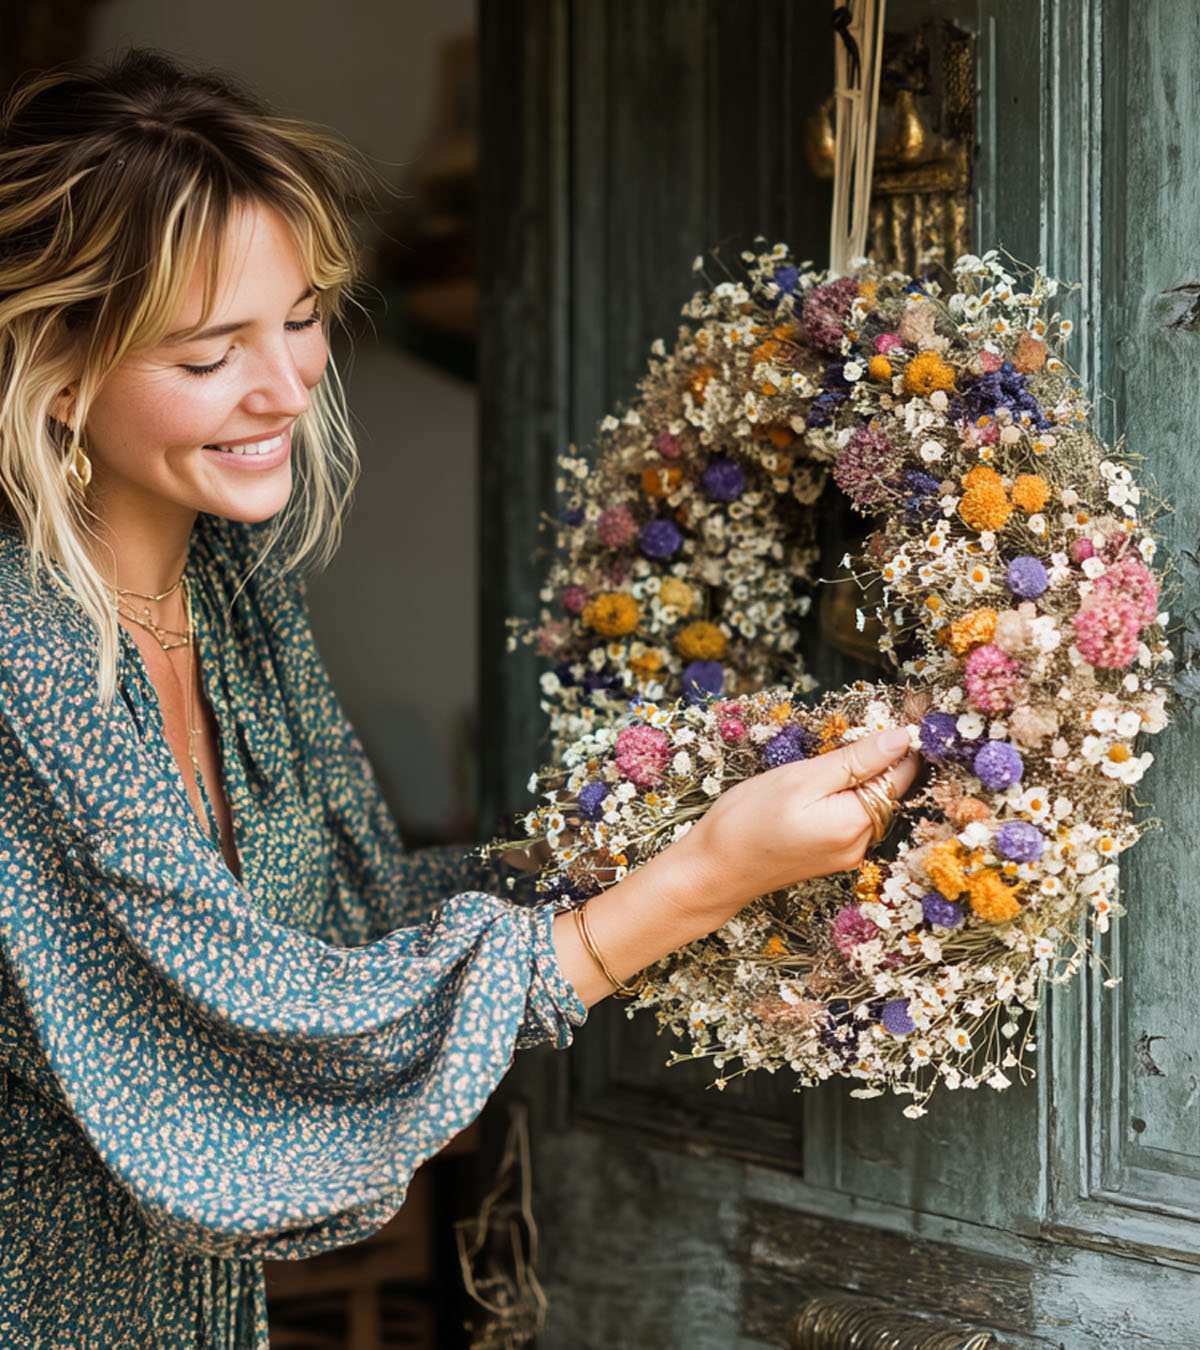
A dried flower wreath is one of the most versatile pieces you can make — perfect for doors, walls, shelves, or as a centrepiece. This tutorial shows you how to create a full, balanced wreath using dried stems, simple tools, and a few easy techniques. Whether you want something wild and meadow‑like or neat and structured, the method is the same — only the flowers change.
Materials Needed

Scissors & Wire Cutters
Floral Wire
(24 gauge)
Florist Tape (optional)
Dried Flowers & Foliage
Ribbon or Jute String (for hanging)
Before You Begin
Take a moment to sort your stems into small groups: focal flowers, fillers, and airy textures. This makes the building process smoother and helps you keep the wreath balanced.
If you’re growing your own flowers, our growing tips page shares how to get strong, healthy blooms that dry beautifully.
Step 1 – Creating the Base
Make Your Own Base Using Willow, Found Stems, or Purchased Frames.
A wreath base can be made from natural stems, foraged materials, or a pre‑made frame. Each option gives a slightly different look, but the method is the same: create a strong, circular structure that your dried flower bundles can be wired onto.
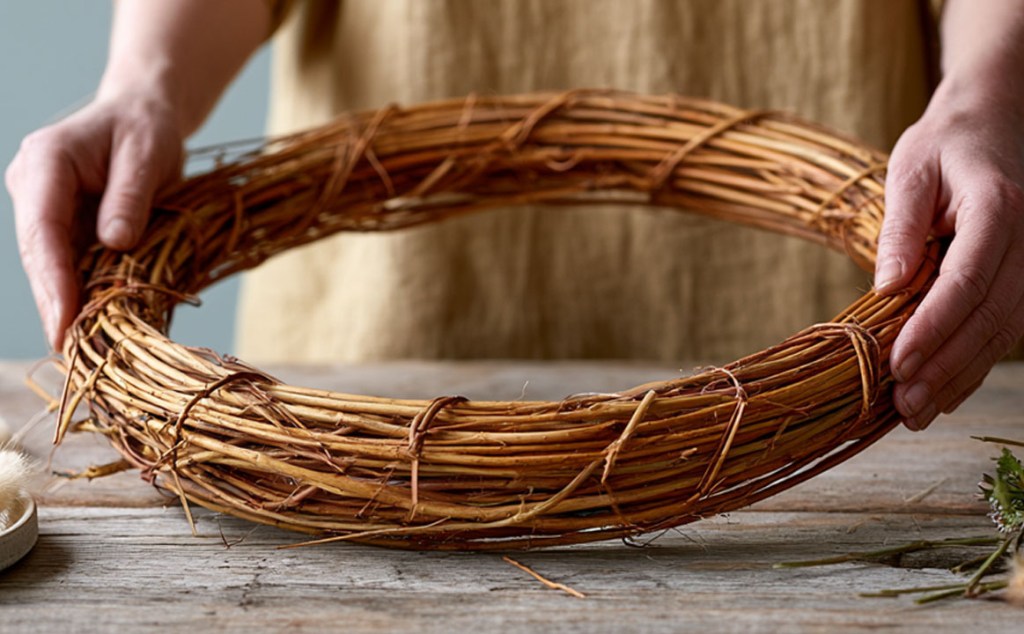
Option A: Making a Base from Willow
Willow is the easiest natural material to bend because it’s naturally flexible and locks itself into shape when wrapped.
Stem length: 120 – 180cm (4-6 feet)
Stem thickness: 6-10mm at the butt end, 3-5mm at the tip.
Stem quantity: 3-5 stems
These lengths allow you to wrap the stems around themselves, which is what creates the strength.
- Soak the willow. (You will know it’s ready when it bends in a smooth arc with no cracking).
Fresh cut willow:
This will not need soaking. If it is slightly dry (cut within the last few weeks), soak for 30-60 minutes.
Partially dried willow:
Soak for 2-4 hours
Fully dried willow:
This is the most common scenario for DIY makers. This will need soaking overnight (8-12 hours). - Form the first loop.
Hold the thick end of the willow rod in one hand. Gently bend the rod into a circle the size you want your wreath to be (usually 25-30cm). Adjust the curve until the circle feels even in size. - Cross the ends to hold the circle.
Bring the two ends past each other slightly so the circle holds its shape in your hands. Don’t worry about how much length is left over – that’s what you’ll use next. - Wrap the remaining length around the circle.
Starting from one end, wrap the remaining length of the rod around the circle, spiralling it along the hoop. Each wrap tightens and locks the shape. Keep the wraps snug but not so tight that the stem kinks. - Add more stems for strength.
Tuck the end of a second rod under one of the wraps and repeat the same process – follow the circle and wrap it around the hoop. Add as many rods as you like until the base feels solid. Usually 3-5 is enough. - Trim and tidy.
Cut off any stems ends which are sticking out. (Careful of your eyes!)

Option B: Using Other Flexible Stems (Dogwood, Hazel, Birch, Ivy, Bramble)
Other flexible stems can be used exactly the same way as willow – the only difference is how much soaking they need and how many stems you will use.
Stem length: 120 – 180cm (4-6 feet)
Stem quantity: 4-8 stems
Use long flexible stems such as dogwood, hazel, birch, ivy vine or young bramble. If they crack when bent, soak them until they bend smoothly.
- Form the first loop.
Bend one stem into a 30cm circle (or your chosen size). Cross the ends to hold the shape. - Wrap the remaining length around the circle.
Wrap the rest of the stem around the circle to lock it in place. The method is identical to willow – refer to Option A for wrapping technique. - Add more stems for strength.
Tuck the end of the next stem under a wrap and continue building the base. You’ll typically need 4-8 stems, depending on thickness and flexibility. - Trim and tidy.
Cut off any stems ends which are sticking out. (Careful of your eyes!)
Option C: Using a Purchased Base
Purchased bases are ideal if you want a quick start or a very uniform shape. They require now soaking and no wrapping – you simple attach your dried flower bundles directly onto them.
- Metal Hoop
Minimal, modern, lightweight.
Perfect for half-wreaths or airy designs.
How to use:
Wire your bundles directly onto the hoop, keeping your angle consistent. - Grape Vine Base
Rustic, natural, wild, organic-style.
How to use:
Push stems into the vine gaps or wire bundles onto the surface. - Straw Wreath Base
Thick, soft and forgiving. Holds securely. Gives a very rounded, traditional shape.
Ideal for full, abundant wreaths.
How to use:
Lay bundles against the straw and rap wire around the entire base to secure. - Rattan or Bamboo Ring
Lightweight, smooth, clean look. Great for minimal or modern designs.
How to use:
Attached bundles with glue or wire for very minimal designs.
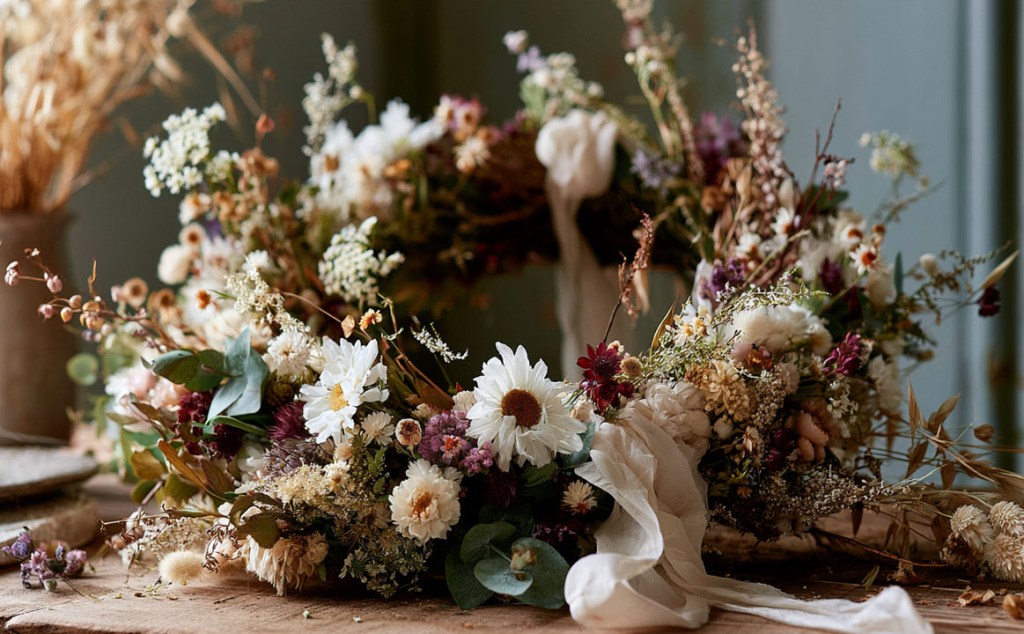
Step 2 – Prepare Your Flowers
Trim and Create Small Bunches
Bundles are the building blocks of your wreath. Each one should be small, neat and easy to wire onto the base. The goal is consistency – if your bundles are roughly the same size, your wreath will look balanced and professional.

- Sort your stems by type
Lay out your dried materials and group them into:
Focal stems (e.g., strawflower, statice, helichrysum, roses)
Fillers (e.g., limonium, achillea, gomphrena)
Airy textures (e.g., grasses, bunny tails, oats, phalaris, nigella pods)
This makes it easier to build bundles quickly and keeps your colour and texture distribution even. - Trim stems to a workable length
Cut stems to 8-12cm long. - Build small bundles
Each bundle should contain:
– 1 focal stem
– 2-4 filler stems
– 1-2 airy stems
Hold them together so the heads sit at slightly different heights – this gives the wreath movement and avoids a flat, “blocked” look. - Make enough bundles for your wreath size
For a 25-30cm wreath, you”’ typically need:
– 12-18 bundles for a full wreath
– 6-10 bundles for a half wreath
– 20+ bundles for a dense, abundant look
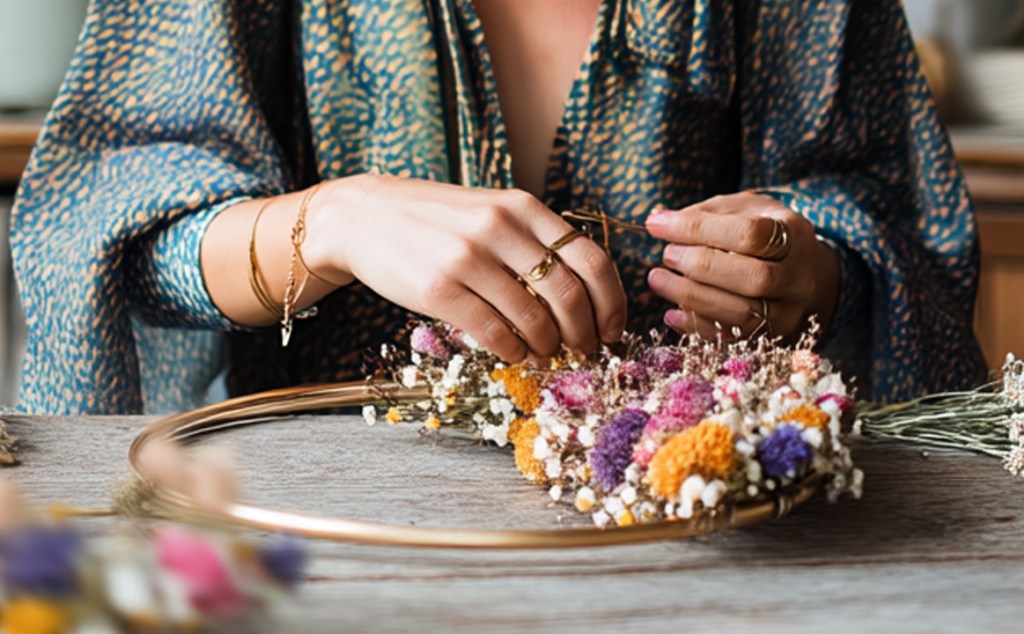
Step 3 – Attach The Flowers
Wrap and Secure Floral Bunches
- Begin attaching your prepared bundles to your base.
- Hold your first taped bundle against the base and secure it by wrapping florist wire firmly around the stems and the base several times. (Enough to secure – not so much that it is bulky. 2/3 times is usually enough).
- Continue adding bundles one by one, overlapping each new bundle slightly over the stems of the previous one so the wreath looks full and seamless. All bundles should point the same way (clockwise or anticlockwise).
Step 4 – Finishing Your Wreath
Add a Hanging Loop and Decorative Ribbon
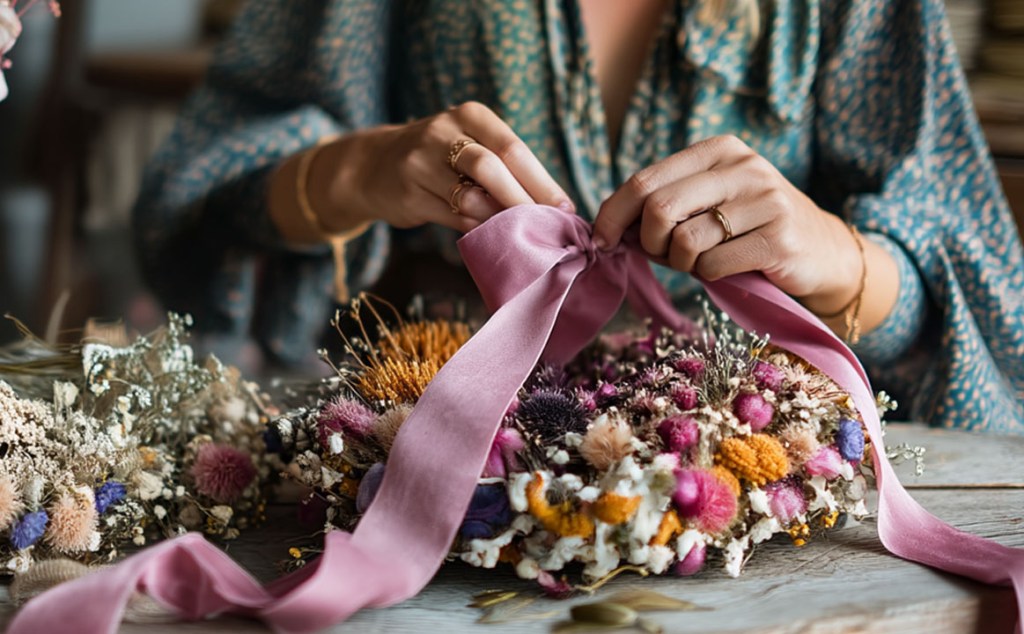
- Create a hanging loop
Cut a short length of strong twine, jute or ribbon and tie it firmly into the back of the wreath creating a loop. - Add an optional decorative ribbon
If you would like to add a ribbon, choose a colour and texture that compliments your dried flowers. Silk, velvet, linen or cotton all work beautifully. Tie it in a simple bow or let long tails hang for a softer, more romantic finish.
Troubleshooting
Crafting with dried flowers can be delicate, so here are quick fixes for the most common issues people run into while making a wreath.
The bundles feel loose
If a bundle shifts or lifts away from the base, add an extra wrap of florist wire around the stems. You can then cover the wire with florist tape, ribbon or jute string to keep the finish soft and comfortable.
My wreath looks uneven
Step back every few bundles and check the shape. If one area looks heavy, add a lighter, airy bundle opposite it to balance the circle.
My flowers keep snapping
Some dried stems are brittle, especially thin or woody varieties. To soften them slightly, you can place stems in a sealed container in the fridge for around 30 minutes. The cool, slightly humid environment helps them regain a touch of flexibility, making them less likely to snap when you bend or trim them.
If they are still fragile, shorten the stems a little more or choose naturally flexible varieties like limonium, statice or grasses.
Why the fridge trick works: It doesn’t ‘rehydrate’ the flowers (you don’t want that) but it gives them a tiny bit of pliability – just enough to stop cracking.
Important note: You should never mist or steam dried flowers to soften them – that ruins the colour and structure. The fridge method is the safest and gentle option.
Gaps are showing between bundles
Increase the overlap between bundles or add a small filler stem (like a grass or tiny flower) to disguise any visible spaces.
The wire is showing
Angle your bundles slightly and ensure each new bundle covers the previous wire wraps.
FAQs
What size wreath base should I use?
20–30 cm is ideal for most designs. Larger bases need more stems and take longer to fill, but really the choice is yours!
How long does a dried flower wreath last?
With gentle handling and dry storage, a dried wreath can last indefinitely. Colours may soften over time which adds to the natural look but keeping them out of sunlight prolongs the life of the colours.
What wire gauge should I use?
24-gauge is ideal – flexible enough to shape but strong enough to hold the structure.
Can I hang it outside?
No – dried flower wreaths shouldn’t be hung outside. Moisture, rain, wind and strong sunlight will damage the stems and cause colours to fade quickly. If you want to display your wreath near an entrance, choose a sheltered, covered area where it’s protected from the weather, or keep it indoors for the longest life.
How do I store my wreath?
Keep it somewhere dry, out of direct sunlight and away from humidity and dust — a shelf or box works well.
Have a question that’s not answered here? Check out our full FAQ page.
Care Instructions
Dried flowers are delicate but long-lasting. Store your wreath somewhere dry and out of direct sunlight to prevent colours from fading. Avoid crushing or bending the flowers and handle the wreath by the base. If dust gathers over time, gently blow it away or use a soft brush. For long-lasting results, follow our simple dried flower care guide to keep your stems looking their best.
Style Variations
Wild Meadow Wreath
Use long grasses and airy textures for a loose, natural look.
Minimal Ring Wreath
Decorate only one third of the base for a modern, lightweight design.
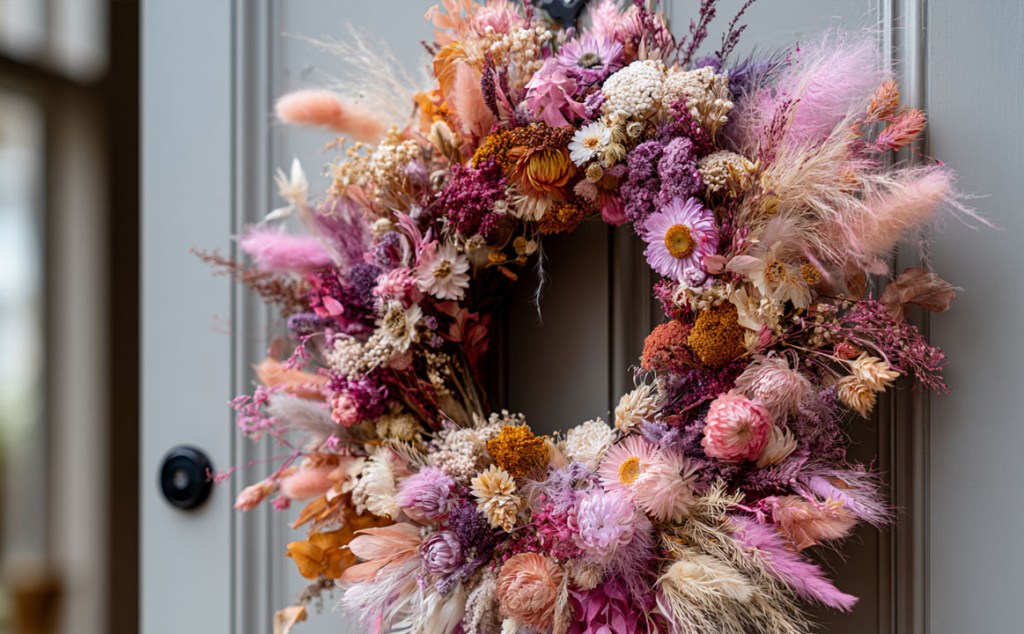
Full Floral Wreath
Pack bundles closely for a lush, abundant finish.
Seasonal Wreath
Choose colours and textures to match the season — soft pastels for spring, warm tones for autumn.
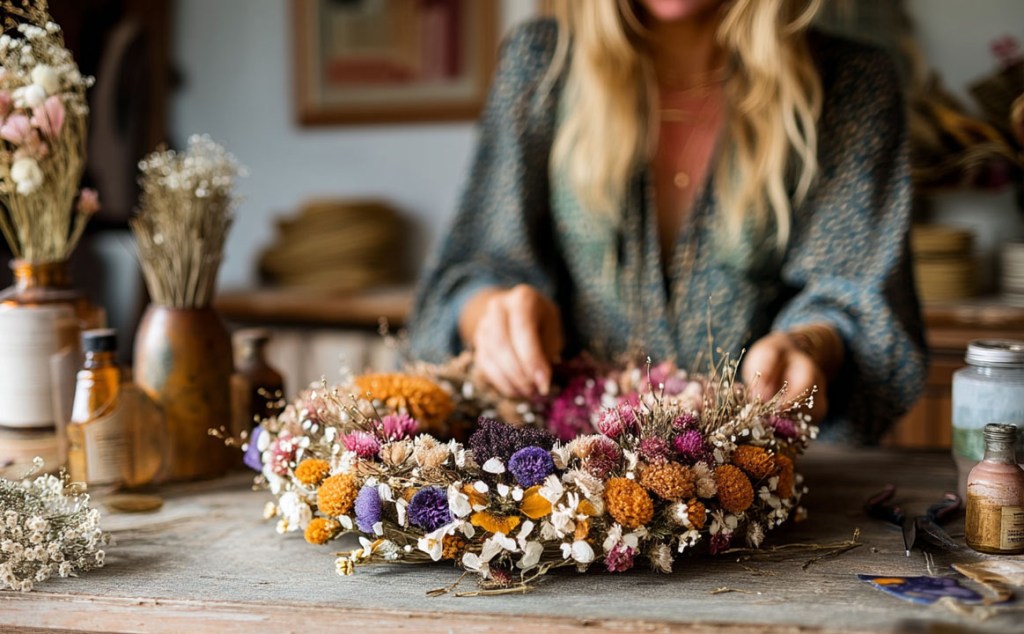
Enjoy Your Dried Flower Wreath!
Your wreath is now ready to display. Whether you hang it on a door, place it on a shelf, or use it as a centrepiece, each one is unique — shaped by your flowers, your hands, and your style.
Want to see more DIY dried flower projects? View our tutorials page.
How to Make a Dried Flower Wreath:
Step-by-Step Tutorial
Easy How to Instructions to Make a Beautiful, Natural DIY Wreath at Home
Time needed: around 60 minutes.
A dried flower wreath is one of the most versatile pieces you can make — perfect for doors, walls, shelves, or as a centrepiece. This tutorial shows you how to create a full, balanced wreath using dried stems, simple tools, and a few easy techniques. Whether you want something wild and meadow‑like or neat and structured, the method is the same — only the flowers change.
Materials Needed
Scissors & Wire Cutters
Floral Wire
(24 gauge)
Florist Tape (optional)
Dried Flowers & Foliage
Ribbon or Jute String (for hanging)
Before You Begin
Take a moment to sort your stems into small groups: focal flowers, fillers, and airy textures. This makes the building process smoother and helps you keep the wreath balanced.
If you’re growing your own flowers, our growing tips page shares how to get strong, healthy blooms that dry beautifully.
Step 1
Creating the Base
Make Your Own Base Using Willow, Found Stems, or Purchased Frames.
A wreath base can be made from natural stems, foraged materials, or a pre‑made frame. Each option gives a slightly different look, but the method is the same: create a strong, circular structure that your dried flower bundles can be wired onto.
Option A: Making a Base from Willow
Willow is the easiest natural material to bend because it’s naturally flexible and locks itself into shape when wrapped.
Stem length: 120 – 180cm (4-6 feet)
Stem thickness: 6-10mm at the butt end, 3-5mm at the tip.
Stem quantity: 3-5 stems
These lengths allow you to wrap the stems around themselves, which is what creates the strength.
- Soak the willow. (You will know it’s ready when it bends in a smooth arc with no cracking).
Fresh cut willow:
This will not need soaking. If it is slightly dry (cut within the last few weeks), soak for 30-60 minutes.
Partially dried willow:
Soak for 2-4 hours
Fully dried willow:
This is the most common scenario for DIY makers. This will need soaking overnight (8-12 hours). - Form the first loop.
Hold the thick end of the willow rod in one hand. Gently bend the rod into a circle the size you want your wreath to be (usually 25-30cm). Adjust the curve until the circle feels even in size. - Cross the ends to hold the circle.
Bring the two ends past each other slightly so the circle holds its shape in your hands. Don’t worry about how much length is left over – that’s what you’ll use next. - Wrap the remaining length around the circle.
Starting from one end, wrap the remaining length of the rod around the circle, spiralling it along the hoop. Each wrap tightens and locks the shape. Keep the wraps snug but not so tight that the stem kinks. - Add more stems for strength.
Tuck the end of a second rod under one of the wraps and repeat the same process – follow the circle and wrap it around the hoop. Add as many rods as you like until the base feels solid. Usually 3-5 is enough. - Trim and tidy.
Cut off any stems ends which are sticking out. (Careful of your eyes!)
Option B: Using Other Flexible Stems (Dogwood, Hazel, Birch, Ivy, Bramble)
Other flexible stems can be used exactly the same way as willow – the only difference is how much soaking they need and how many stems you will use.
Stem length: 120 – 180cm (4-6 feet)
Stem quantity: 4-8 stems
Use long flexible stems such as dogwood, hazel, birch, ivy vine or young bramble. If they crack when bent, soak them until they bend smoothly.
- Form the first loop.
Bend one stem into a 30cm circle (or your chosen size). Cross the ends to hold the shape. - Wrap the remaining length around the circle.
Wrap the rest of the stem around the circle to lock it in place. The method is identical to willow – refer to Option A for wrapping technique. - Add more stems for strength.
Tuck the end of the next stem under a wrap and continue building the base. You’ll typically need 4-8 stems, depending on thickness and flexibility. - Trim and tidy.
Cut off any stems ends which are sticking out. (Careful of your eyes!)

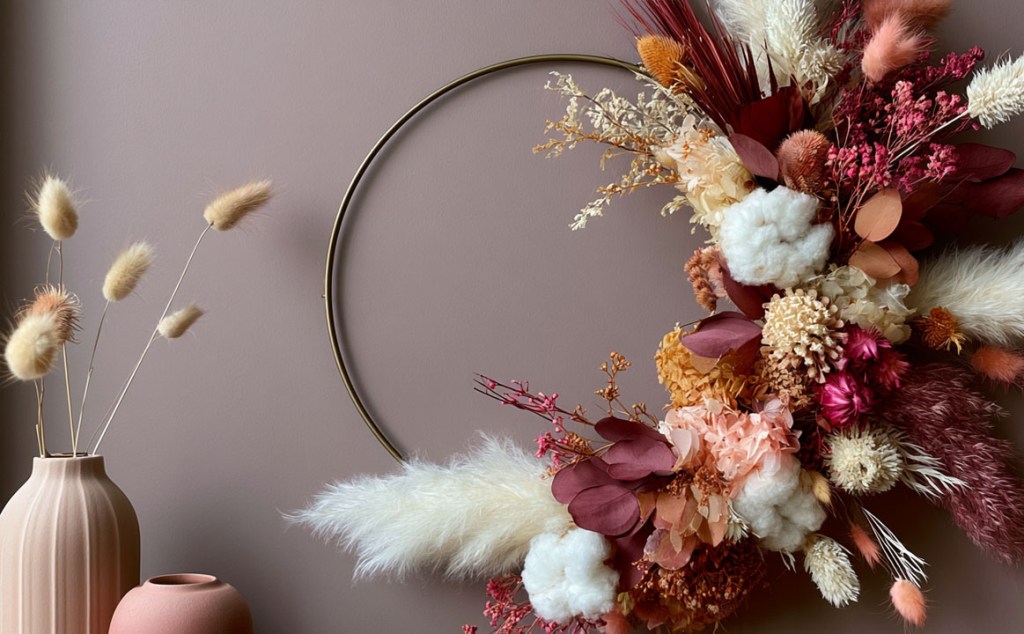
Option C: Using a Purchased Base
Purchased bases are ideal if you want a quick start or a very uniform shape. They require now soaking and no wrapping – you simple attach your dried flower bundles directly onto them.
- Metal Hoop
Minimal, modern, lightweight.
Perfect for half-wreaths or airy designs.
How to use:
Wire your bundles directly onto the hoop, keeping your angle consistent. - Grape Vine Base
Rustic, natural, wild, organic-style.
How to use:
Push stems into the vine gaps or wire bundles onto the surface. - Straw Wreath Base
Thick, soft and forgiving. Holds securely. Gives a very rounded, traditional shape.
Ideal for full, abundant wreaths.
How to use:
Lay bundles against the straw and rap wire around the entire base to secure. - Rattan or Bamboo Ring
Lightweight, smooth, clean look. Great for minimal or modern designs.
How to use:
Attached bundles with glue or wire for very minimal designs.
Step 2
Prepare Your Flowers
Trim and Create Small Bunches
Bundles are the building blocks of your wreath. Each one should be small, neat and easy to wire onto the base. The goal is consistency – if your bundles are roughly the same size, your wreath will look balanced and professional.
- Sort your stems by type
Lay out your dried materials and group them into:
Focal stems (e.g., strawflower, statice, helichrysum, roses)
Fillers (e.g., limonium, achillea, gomphrena)
Airy textures (e.g., grasses, bunny tails, oats, phalaris, nigella pods)
This makes it easier to build bundles quickly and keeps your colour and texture distribution even. - Trim stems to a workable length
Cut stems to 8-12cm long. - Build small bundles
Each bundle should contain:
– 1 focal stem
– 2-4 filler stems
– 1-2 airy stems
Hold them together so the heads sit at slightly different heights – this gives the wreath movement and avoids a flat, “blocked” look. - Make enough bundles for your wreath size
For a 25-30cm wreath, you”’ typically need:
– 12-18 bundles for a full wreath
– 6-10 bundles for a half wreath
– 20+ bundles for a dense, abundant look
Step 3
Attach The Flowers
Wrap and Secure Floral Bunches
- Begin attaching your prepared bundles to your base.
- Hold your first taped bundle against the base and secure it by wrapping florist wire firmly around the stems and the base several times. (Enough to secure – not so much that it is bulky. 2/3 times is usually enough).
- Continue adding bundles one by one, overlapping each new bundle slightly over the stems of the previous one so the wreath looks full and seamless. All bundles should point the same way (clockwise or anticlockwise).
Step 4
Finishing Your Wreath
Add a Hanging Loop and Decorative Ribbon
- Create a hanging loop
Cut a short length of strong twine, jute or ribbon and tie it firmly into the back of the wreath creating a loop. - Add an optional decorative ribbon
If you would like to add a ribbon, choose a colour and texture that compliments your dried flowers. Silk, velvet, linen or cotton all work beautifully. Tie it in a simple bow or let long tails hang for a softer, more romantic finish.
Troubleshooting
Crafting with dried flowers can be delicate, so here are quick fixes for the most common issues people run into while making a wreath.
The bundles feel loose
If a bundle shifts or lifts away from the base, add an extra wrap of florist wire around the stems. You can then cover the wire with florist tape, ribbon or jute string to keep the finish soft and comfortable.
My wreath looks uneven
Step back every few bundles and check the shape. If one area looks heavy, add a lighter, airy bundle opposite it to balance the circle.
My flowers keep snapping
Some dried stems are brittle, especially thin or woody varieties. To soften them slightly, you can place stems in a sealed container in the fridge for around 30 minutes. The cool, slightly humid environment helps them regain a touch of flexibility, making them less likely to snap when you bend or trim them.
If they are still fragile, shorten the stems a little more or choose naturally flexible varieties like limonium, statice or grasses.
Why the fridge trick works: It doesn’t ‘rehydrate’ the flowers (you don’t want that) but it gives them a tiny bit of pliability – just enough to stop cracking.
Important note: You should never mist or steam dried flowers to soften them – that ruins the colour and structure. The fridge method is the safest and gentle option.
Gaps are showing between bundles
Increase the overlap between bundles or add a small filler stem (like a grass or tiny flower) to disguise any visible spaces.
The wire is showing
Angle your bundles slightly and ensure each new bundle covers the previous wire wraps.
FAQs
What size wreath base should I use?
20–30 cm is ideal for most designs. Larger bases need more stems and take longer to fill, but really the choice is yours!
How long does a dried flower wreath last?
With gentle handling and dry storage, a dried wreath can last indefinitely. Colours may soften over time which adds to the natural look but keeping them out of sunlight prolongs the life of the colours.
What wire gauge should I use?
24-gauge is ideal – flexible enough to shape but strong enough to hold the structure.
Can I hang it outside?
No – dried flower wreaths shouldn’t be hung outside. Moisture, rain, wind and strong sunlight will damage the stems and cause colours to fade quickly. If you want to display your wreath near an entrance, choose a sheltered, covered area where it’s protected from the weather, or keep it indoors for the longest life.
How do I store my wreath?
Keep it somewhere dry, out of direct sunlight and away from humidity and dust — a shelf or box works well.
Have a question that’s not answered here? Check out our full FAQ page.
Care Instructions
Dried flowers are delicate but long-lasting. Store your wreath somewhere dry and out of direct sunlight to prevent colours from fading. Avoid crushing or bending the flowers and handle the wreath by the base. If dust gathers over time, gently blow it away or use a soft brush. For long-lasting results, follow our simple dried flower care guide to keep your stems looking their best.
Style Variations
Wild Meadow Wreath
Use long grasses and airy textures for a loose, natural look.
Minimal Ring Wreath
Decorate only one third of the base for a modern, lightweight design.
Full Floral Wreath
Pack bundles closely for a lush, abundant finish.
Seasonal Wreath
Choose colours and textures to match the season — soft pastels for spring, warm tones for autumn.
Enjoy Your Dried Flower Wreath!
Your wreath is now ready to display. Whether you hang it on a door, place it on a shelf, or use it as a centrepiece, each one is unique — shaped by your flowers, your hands, and your style.
Want to see more DIY dried flower projects? View our tutorials page.